May is the busiest month for gardeners in Southeast Wisconsin. Soil temperatures climb past 60°F by mid-month, the last frost typically passes between May 10 and 20, and almost every job that’s been waiting for warm weather lines up at once. If you only have a few weekends to make things happen, this is the month to spend them outside. Here are six tasks worth doing in your Zone 5b garden right now.
1. Plant Warm-Season Vegetables and Annuals
Once nighttime temps stay reliably above 50°F and your soil thermometer reads 60°F or warmer at four inches deep, the warm-season crops can go in. Tomatoes, peppers, squash, cucumbers, beans, basil — they all want this kind of weather. Same goes for the heat-loving annuals: marigolds, petunias, zinnias, cosmos, and sunflowers will take off in May soil.
One small thing that makes a big difference: bury tomato transplants deep, all the way up to the first true leaves. Roots will form along the buried stem and you’ll end up with a stronger, more drought-resistant plant.
Harden off before transplanting:
If you started seeds indoors, give them a week of gradual outdoor exposure before they go in the ground. A few hours in shade on day one, longer and sunnier each day after. Skipping this step is the most common reason transplants stall out or get sunburned in their first week outside.
Watch the forecast through May 20. A late cold snap is uncommon but not unheard of in Southeast Wisconsin, and a single 32°F night can wipe out tender seedlings. Keep a few row covers or old sheets handy.
2. Divide and Multiply Your Perennials
Spring is the right time to divide most summer- and fall-blooming perennials before they put on serious growth. Hostas, daylilies, sedums, asters, coneflowers, and ornamental grasses all respond well to division when the new growth is just a few inches tall. You’ll get healthier, more vigorous plants, you’ll keep mature clumps from outgrowing their spot, and you’ll come away with free starts to fill bare ground elsewhere or share with a neighbor.
The process is straightforward. Dig the entire clump, lift it out of the ground, and split it with a sharp spade or two garden forks back-to-back. Replant the divisions promptly at the same depth they were before, water deeply, and mulch around the new plantings to hold moisture and reduce stress while the roots re-establish.
Skip dividing fall-blooming perennials in May. Mums, asters, and Japanese anemones do better with a fall division after they’ve finished flowering.
3. Feed What You’ve Already Planted
The burst of spring growth depletes soil nutrients fast. Established perennials, shrubs, and trees benefit from a balanced slow-release fertilizer applied in early to mid-May. The slow-release part matters: it feeds the plant gradually over several weeks instead of all at once, which means less leaching and steadier growth.
Acid-loving plants like azaleas, rhododendrons, blueberries, and hydrangeas have their own fertilizer formulations. Don’t substitute a general-purpose product for these — the soil chemistry is different and a regular fertilizer can actually push the pH the wrong direction over time.
Time it with the rain:
Apply fertilizer right before a rain if you can. The water carries the nutrients into the root zone evenly. If rain isn’t in the forecast, water the area thoroughly after applying. Either way, follow the rate on the label. More isn’t better, and over-fertilizing can burn roots and push too much soft growth that struggles in summer heat.
4. Prune Spring-Flowering Shrubs Right After They Finish
Lilacs, forsythia, viburnum, mock orange, and other spring bloomers set next year’s flower buds during the summer following bloom. That means the pruning window is narrow: as soon as the flowers fade, before the plant invests energy in next year’s buds. Wait too long and you’ll cut off your own flowers for the following spring.
Focus on three things when you prune:
Shape: Reduce overall height and width if the shrub is outgrowing its space, but don’t take more than a third of the plant in one season.
Thin: Cut a few of the oldest, thickest stems all the way to the ground. This opens up the interior to light and air, and encourages new vigorous growth from the base.
Clean up: Remove anything dead, broken, or rubbing against another branch.
Summer-flowering shrubs work the opposite way. Rose of Sharon, smooth hydrangea (the Annabelle types), and panicle hydrangea bloom on new wood, so they get pruned in late winter or very early spring before growth starts. Don’t touch those now.
5. Get Ahead of Pests Before They Take Over
As the weather warms, the regulars start showing up: aphids on new growth, slugs on hostas, beetles on roses and ornamental cherries. The best time to deal with pests is before the population explodes, and May is when you can still get ahead of most of them with light intervention.
A few low-effort things that work:
Encourage beneficials: Ladybugs, lacewings, and predatory wasps eat huge numbers of aphids and small caterpillars. Plant some yarrow, dill, or sweet alyssum nearby to attract them.
Hand-pick what you can: A bucket of soapy water and ten minutes after dinner handles a surprising amount of beetle and slug pressure.
Use row covers on young vegetables: A lightweight floating cover keeps cabbage moths off broccoli and carrot rust flies off carrots until plants are big enough to handle some damage.
Keep beds weed-free: Weeds shelter pests and pull moisture away from the plants you actually want. A weekly walk-through with a hoe pays off through July.
Skip the heavy chemicals if you can. Most early-season pest pressure responds to physical removal, beneficial insects, and good garden hygiene. Save the targeted treatments for situations where those approaches aren’t keeping up.
6. Install Stakes, Cages, and Trellises Now
This is the tip most people learn the hard way. Plant supports are easier to install when plants are small. Try to add them in July when tomatoes are sprawling and peonies are flopping over from the first heavy rain, and you’ll be working around brittle stems, tangled foliage, and roots that resent being disturbed.
Set tomato cages or stakes when you transplant. Drive trellis posts for pole beans, peas, and cucumbers before the seedlings emerge. For heavy-blooming perennials like peonies, tall phlox, and dahlias, peony hoops or grow-through grids work best when slipped over the crown while the new shoots are still under six inches.
The supports disappear into the foliage as plants fill out, and the structure is already there when wind, rain, or sheer flower weight would otherwise lay everything down.
FAQ
When is the last frost in Southeast Wisconsin?
The average last frost in Zone 5b runs from about May 10 to May 20, with some variation year to year. A late frost can still hit through Memorial Day weekend in cooler years, so watch the forecast through late May if you’ve already planted tender annuals or warm-season vegetables. Row covers or old sheets draped over plants overnight handle most short cold snaps.
Should I cut the leaves off spring bulbs after they bloom?
No. Leave the foliage intact until it yellows and dies back naturally, which takes about 6 to 8 weeks after blooming. The leaves are still photosynthesizing and feeding the bulb for next year’s flower. You can snip the spent flower stems for a tidier look, but don’t touch the leaves until they’ve gone fully yellow.
How do I know when my soil is warm enough for tomatoes?
A simple soil thermometer pushed about four inches into the bed gives you the answer. Read it in the morning for a few days in a row. Tomatoes want consistent readings of 60°F or above before they’ll really start growing. In Southeast Wisconsin, that’s typically around May 15 to 20, depending on the year. Planting too early just means transplants that sit and sulk for two weeks before doing anything.
Stop By and We’ll Get You Set Up
Stop by Heritage Hill Nursery in Cedarburg this week for warm-season transplants, perennials worth dividing, the right fertilizer for what you’re growing, and any of the supports and tools you need to make this month count. Our crew is happy to walk through your specific yard and pick out exactly what fits. Always good to talk gardens.
This Month’s Special
50% Off Fountains & Fountainettes
All May at our Cedarburg garden center. In-store only. While supplies last.
If mulching is on your spring to-do list, there’s one extra step that can save you a lot of weeding later. It adds about 20 minutes to the job and costs a few bucks.
The step: apply a pre-emergent herbicide to your soil before you lay your mulch.
We talk about this with customers at the nursery all the time. The ones who try it almost always come back saying the same thing: their beds stayed cleaner all season with a fraction of the usual weeding.
What Pre-Emergent Herbicide Does
A pre-emergent herbicide prevents weed seeds from germinating. It creates a chemical barrier in the top layer of soil that keeps seeds from sprouting. No sprouts, no weeds. That’s the idea.
Timing matters here. You need to get it down before weed seeds start germinating, which in Southeast Wisconsin is usually early to mid-spring. If you can already see weeds pushing through, the pre-emergent window has passed for those seeds. Pull what’s there first, then apply the herbicide to catch the next round.
Why It’s Worth Doing
The short version:
Fewer weeds competing for water and nutrients
Less time on your hands and knees pulling them
Cleaner, better-looking beds all season
Mulch works harder when it’s not fighting weeds from below
Mulch on its own does solid work. It holds moisture, keeps soil temperature steady, and blocks some light from reaching weed seeds. But mulch alone doesn’t stop everything. Plenty of weeds are stubborn enough to push through a mulch layer if the seeds are already in the soil underneath.
That’s where the pre-emergent comes in. The herbicide handles the seeds in the soil. The mulch handles everything above. Together, the two are far more effective than either one alone.
How to Apply It
1
Choose the Right Product
Pre-emergent herbicides come in granular and liquid forms. Both work well. The key is matching the product to your plants and the weed species common in your area. Different products target different weeds, so read the label. If you’re not sure what to grab, bring in a photo of your beds or describe what you’re dealing with. We can point you to the right product pretty quickly.
2
Prep the Area
Pull whatever weeds are already there and clear out leaves, sticks, and debris. If the soil surface is hard-packed, loosen it up so the herbicide distributes evenly. Consistent coverage across the whole bed is what you’re after.
3
Apply Evenly
For granular products, use a handheld or push spreader. For liquids, a pump sprayer works well. Follow the application rate on the label. Putting down too much can stress plants, and uneven coverage leaves gaps where weeds will find their way through. Take your time here. The difference between a bed that stays clean and one that gets patchy by June usually comes down to how evenly the herbicide was applied.
4
Water Lightly
After applying, give the area a light watering to activate the product and help it bond to the soil. You don’t need to drench it. Just wet the surface enough to get things working.
5
Add Your Mulch
Once the pre-emergent is down and activated, spread your mulch on top. A 2-3 inch layer works well for most beds. The mulch locks in the herbicide, adds its own layer of weed suppression, and keeps soil moist and temperature-regulated underneath.
A Caution About New Plantings
Watch out around anything planted in the last year.
Plants installed recently are still developing their root systems. Pre-emergent herbicides can interfere with that process, especially around tender new roots. Use the herbicide lightly in those areas, keep it away from the plant base, or skip it entirely and hand-weed instead. A little more work now protects your investment in those new plants.
Not sure if your plantings are established enough? Come talk to us. We can look at what you’ve got and recommend the right approach.
Stop By and We’ll Get You Set Up
We carry pre-emergent herbicides, mulch, spreaders, and everything else you need to get your beds ready for the season. And if you want a second opinion on your plan, that’s what we’re here for.
THIS MONTH’S SPECIAL
25% Off Donald Wyman Lilac
They bloom earlier than most lilacs, the fragrance is outstanding, and they handle our winters without trouble. Good time to get one in the ground.
Spring is finally shaking off its grip in Southeast Wisconsin, and the nursery yard is filling up fast. We’ve been unloading fresh stock all week, and the smell of damp soil and new growth is hard to beat. If you’ve driven past our Cedarburg location lately, you’ve probably noticed the color coming back. It’s happening.
April Special: 25% Off Donald Wyman Lilac
All month long, we’re offering 25% off Donald Wyman Lilac. These are some of the best-performing lilacs we carry for Zone 5b. The Donald Wyman was bred for fragrance and disease resistance, and they deliver on both counts. Compact enough for smaller yards, sturdy enough to anchor a border planting, and they bloom early, right when you need that first big burst of spring color and scent.
Donald Wyman Lilac Quick Facts
Hardiness Zone
Zone 3-7 (perfect for our Zone 5b)
Bloom Time
Early to mid-spring
Fragrance
Strong, classic lilac scent
Disease Resistance
Excellent (bred for mildew resistance)
Size
Compact; great for smaller yards
Please note: the discount applies to Donald Wyman varieties only. Other lilac varieties remain at the regular price. Excludes Online; All Sales Final orders; All sales final.
Why Lilacs Belong in a Wisconsin Garden
There’s a reason lilacs show up in almost every established garden around here. They’re tough, long-lived, and they ask very little of you once they’re established. A mature Donald Wyman Lilac will reward you with weeks of bloom every spring. Plant them near a window or along a walkway where you’ll catch the fragrance on a warm afternoon. They also make excellent cut stems for the kitchen table.
Quick Tip: Pre-Emergent Herbicide Before Mulching
Before you lay down fresh mulch this spring, consider applying a pre-emergent herbicide first. This simple step blocks weed seeds from germinating under your mulch layer, which means far less hand-weeding through the summer. Timing matters: you want to get it down before soil temperatures hit about 55 degrees consistently. We wrote up a detailed guide on this if you want the full rundown: Pre-Emergent Herbicide Before Mulching.
Stop by Heritage Hill Nursery this April and grab a Donald Wyman Lilac while the selection is strong. Our staff can help you pick the right variety for your spot and give you planting tips specific to our local soil conditions. We look forward to seeing you out here.
April Special
25% Off Donald Wyman Lilac
All month long at Heritage Hill Nursery. In-store only. All sales final.
Thank you for being part of another wonderful season here at Heritage Hill Nursery! We truly appreciate your support and trust in us.
As we move into winter, please note that starting November 1st, we’ll be open by appointment only through the season. However, our team is still available for landscaping projects, so feel free to reach out at 262-305-4045 to schedule a consultation or project.
Looking forward to serving you through winter and into the next season!
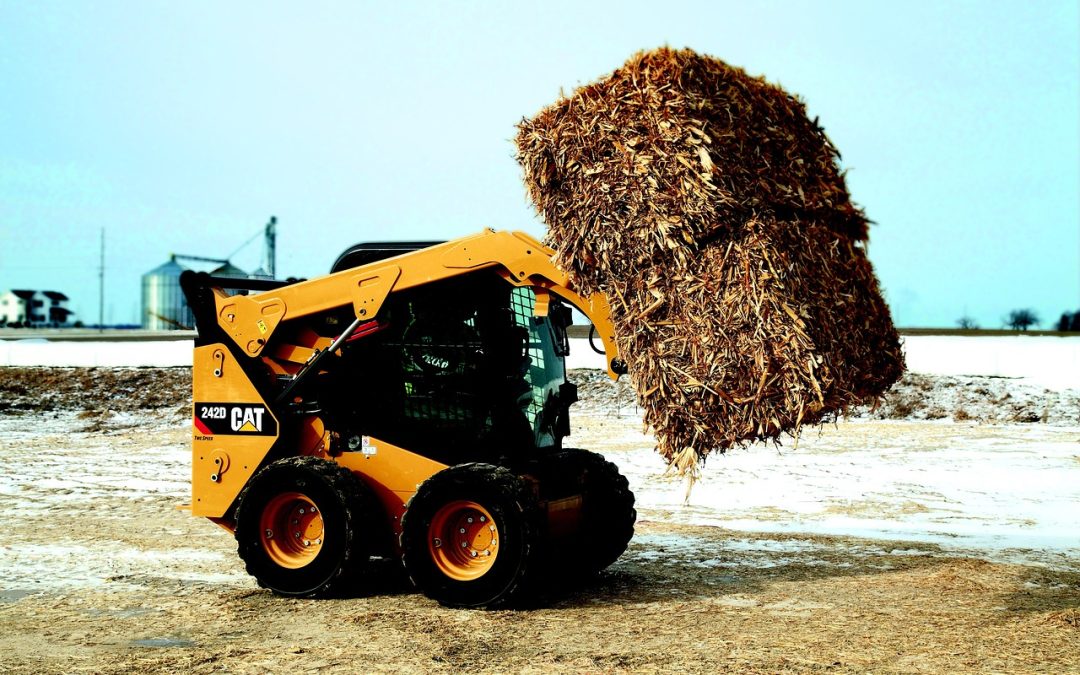
We want to inform you about an important change regarding our skid-loading services for the rest of the season. We cannot guarantee that a skilled skid loader operator will be available on-site during all business hours.
If you require assistance with loading mulch or trees, we highly encourage calling ahead to confirm the availability of an operator. This will help us ensure that we can meet your needs efficiently and avoid any inconvenience.
We appreciate your understanding and continued support. Please don’t hesitate to reach out with any questions or to check availability.
Spring is officially here!! Unfortunately, so is the start of road construction projects. For those customers that have physically visited our Garden Center, you know that our property is near the intersections of Pleasant Valley Rd, Hwy NN (aka Washington Ave.) and Granville Rd (aka Hwy Y). Over the years, that intersection has been the source of numerous accidents ranging from minor to fatal. It had been decided last year to put up stoplights and then close down the small section of Pleasant Valley Rd that intersects Hwy NN, next to Weir Financial.
The project will begin Monday the 10th with the estimated completion date, sometime in September. What this will mean for our customers that use either Hwy I to connect to Cedar Sauk or Pleasant Valley; or Granville Rd (aka Hwy Y) to Hwy NN (aka Washington Ave) or Pleasant Valley Rd; or for customers taking Hwy NN (aka Washington Ave) out of Cedarburg to Pleasant Valley Rd, will be caught in the detour.
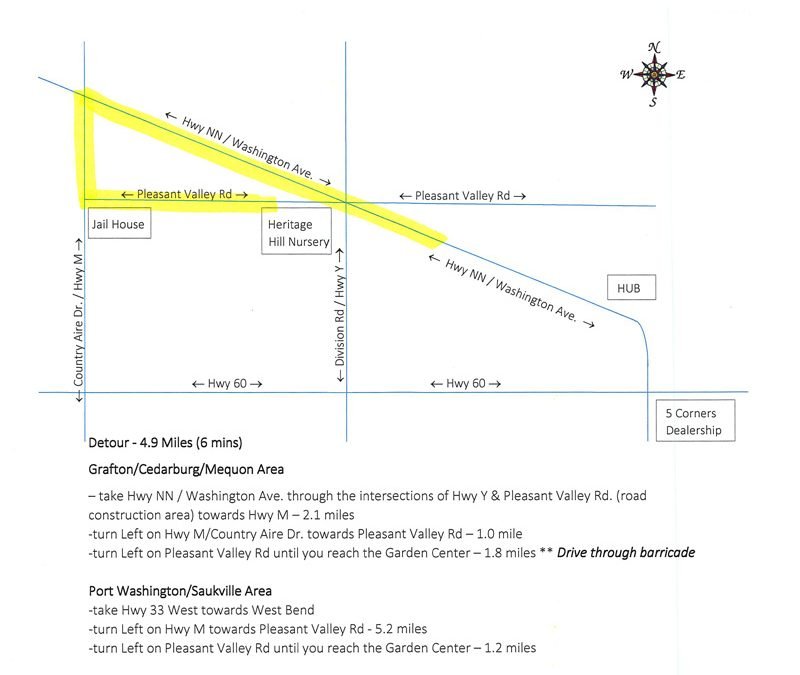
Below is a picture of the detour. If planning on visiting the Garden Center during this time, please refer to the map and to find the best alternate. According to Google Maps, the detour as listed will re-route customers an additional 4.9 miles / 6 mins. from the closed intersection.
Construction is always a pain, but the end results are often worth it and in this case having a safer corner, reduced speeds, and less accidents, will be worth a little hassle.
To provide the best experiences, we use technologies like cookies to store and/or access device information. Consenting to these technologies will allow us to process data such as browsing behavior or unique IDs on this site. Not consenting or withdrawing consent, may adversely affect certain features and functions.
Functional
Always active
The technical storage or access is strictly necessary for the legitimate purpose of enabling the use of a specific service explicitly requested by the subscriber or user, or for the sole purpose of carrying out the transmission of a communication over an electronic communications network.
Preferences
The technical storage or access is necessary for the legitimate purpose of storing preferences that are not requested by the subscriber or user.
Statistics
The technical storage or access that is used exclusively for statistical purposes.The technical storage or access that is used exclusively for anonymous statistical purposes. Without a subpoena, voluntary compliance on the part of your Internet Service Provider, or additional records from a third party, information stored or retrieved for this purpose alone cannot usually be used to identify you.
Marketing
The technical storage or access is required to create user profiles to send advertising, or to track the user on a website or across several websites for similar marketing purposes.